Something about Sectional Warping
When I began warping sectionally, there was a good bit of information on how to load the warp beam, but scant instruction of how to securely and easily get the warp ends to the heddles.
Through a process of trial and error, I have come up with a simple process, which has been working well for me.
When I bought this loom, she did not come with any lease sticks. She also had a plain beam.
Because I knew I wanted to add a sectional beam to her, I did not worry about buying the lease sticks and decided to make a pair from yard sticks.
The handsome hubby trimmed down a pair of yard sticks, two inches wider than her weaving width, and drilled a hole one-inch in from each end.
Note: These did not work well as lease sticks for me, so I ended up substituting thick dowels as lease sticks. The dowels were cut several inches wider than the weaving width.
When I plain warp looms, I secure the lease sticks (once they have been pulled through the crosses) to the castle with a pair of nylon cords tied to the castle. I thread the lease sticks by holding them on top of one another. As there are two cord ends on each side, one cord is threaded top to bottom through the lease sticks and the other is threaded bottom to top. Once threaded, I tie the ends around the back beam.
Additional note: When plain warping, as the yard sticks did not work well and I substituted heavy dowels, I secured them by twisting the nylon cords over and under the first dowel and under and over the second dowel on each side, then wrapped pony tail holders at each end to keep the cord from slipping off. The dowels can be substituted freely. As my weaving width is 32" on this loom, my dowels were at least 36" wide. The longer the better, actually.
When I sectionally beam, I do the same thing. I secure the empty lease sticks between the castle and back beam.

In the sectional application, a pair of lease sticks is preferred, as they can slide up and down the cord, but generally stay put. A single lease stick would slide at will.
Next, I take a yard stick (or something similar that is thin and long enough to accommodate the width of the warp) and carefully tape each of the warp bundles to it.


This uses 8/2 cotton in three shades of brown and one red with a sett of 24, which was basically dictated by the use of 12 thread blocks (1-2-3-4 and 5-6-7-8).
Honestly, I went with a sett of 24 because it was easier to warp the 12 thread blocks sectionally.
If I were to warp the plain beam, I would have changed the sett and set up the colors a bit differently, but I was anxious to get a warp on the newly upgraded Lil' Miss.
Now, back to weaving.
Through a process of trial and error, I have come up with a simple process, which has been working well for me.
When I bought this loom, she did not come with any lease sticks. She also had a plain beam.
Because I knew I wanted to add a sectional beam to her, I did not worry about buying the lease sticks and decided to make a pair from yard sticks.
The handsome hubby trimmed down a pair of yard sticks, two inches wider than her weaving width, and drilled a hole one-inch in from each end.
Note: These did not work well as lease sticks for me, so I ended up substituting thick dowels as lease sticks. The dowels were cut several inches wider than the weaving width.
When I plain warp looms, I secure the lease sticks (once they have been pulled through the crosses) to the castle with a pair of nylon cords tied to the castle. I thread the lease sticks by holding them on top of one another. As there are two cord ends on each side, one cord is threaded top to bottom through the lease sticks and the other is threaded bottom to top. Once threaded, I tie the ends around the back beam.
Additional note: When plain warping, as the yard sticks did not work well and I substituted heavy dowels, I secured them by twisting the nylon cords over and under the first dowel and under and over the second dowel on each side, then wrapped pony tail holders at each end to keep the cord from slipping off. The dowels can be substituted freely. As my weaving width is 32" on this loom, my dowels were at least 36" wide. The longer the better, actually.
When I sectionally beam, I do the same thing. I secure the empty lease sticks between the castle and back beam.

In the sectional application, a pair of lease sticks is preferred, as they can slide up and down the cord, but generally stay put. A single lease stick would slide at will.
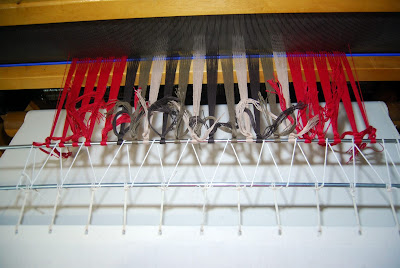
Next, I take a yard stick (or something similar that is thin and long enough to accommodate the width of the warp) and carefully tape each of the warp bundles to it.

Releasing the brake, I carefully unroll enough warp to cover the distance to the heddles and another eight-inches or so to get through the reed, too.

Serendipitously, I have a piece of heavy card stock from the inside of a roll of Christmas wrapping paper. Most rolls are a long tube, but this one was just tightly coiled card stock. It was not long enough to be much help as warp separator, but I kept it anyway. It is PERFECT for wrapping around the exposed sectional pins to prevent the warp from catching.
Thus, I use the curved card stock by allowing it to hug the sectional beam.


Finally, I loosely tape (using low tack painter's tape) the yard stick with the warp end bundles to the lease sticks.
In this photo, I have tucked the ends of the yard stick between the nylon cords.

Now, I was ready to begin threading my heddles.
Fortunately, both my Macomber looms have removable beaters and the front beam opens to lay nicely on the floor, allowing me to sit in the loom.
This little cushioned chair is a pedicure chair (from Amazon). It adjusts from 13" to 15" in height, which is just right for me to thread heddles. It was a little pricey, but I swear by this thing. In fact, the husband used it when upgrading my loom, too! He was very happy to have it.

As an aside, I have noticed that once I have lashed the warp onto the apron rod, unless my warp spans the entire weaving width of my loom, the rod tends to bow in the middle, toward the castle, creating a frown.
To prevent this, I am aware Peggy Osterkamp recommends slipping off the cord attaching the rod to the apron beam.
I have the utmost respect for Ms. Osterkamp and have no doubt she has forgotten more about weaving than I will ever know, but my rods are attached to the apron using waxed hemp and tied on expertly by the good people at Macomber.
One of the reasons I purchased new aprons for each beam on both my looms was to have the rods attached perfectly equidistant all along the apron. Thus, I have absolutely no intention of untying and retying any of it, ever.
However, I still did not like the bowing.
When I was in Yarnorama a few weeks ago, I asked the owner, Susan Fricks, the incredible weaving guru and my de facto weaving mentor, about this bowing. Specifically, I asked whether I had to untie the rod to the apron on those portions not used for the warp.
"Absolutely not!" was her emphatic response.
YAY!
She walked me over to one of the looms and asked if I used a rod to attach the warp to the back beam.
I said: "Yes."
She continued, "Then just use another rod to lash on to the apron beam."
Voila!

I love super smart people who know their stuff.
Thank you, Susan!
Shortly thereafter, I was playing with twill blocks!

This uses 8/2 cotton in three shades of brown and one red with a sett of 24, which was basically dictated by the use of 12 thread blocks (1-2-3-4 and 5-6-7-8).
Honestly, I went with a sett of 24 because it was easier to warp the 12 thread blocks sectionally.
If I were to warp the plain beam, I would have changed the sett and set up the colors a bit differently, but I was anxious to get a warp on the newly upgraded Lil' Miss.
Now, back to weaving.


Comments