That photo shoot...with a guide to afterthought sleeves
When I finished the Perry Street Rugby sweater, there was nary a soul to model. Also, when I finished the Strokkur sweater, I had a model, but it was not the person to whom the sweater had been intended.
So, I actually had them both at my disposal yesterday afternoon.
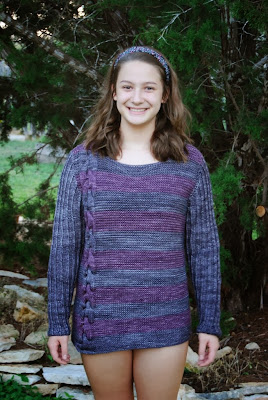
Please note, it was really hot and humid down here in South Texas yesterday. Shorts were necessary. The younger daughter in the Perry Street had actually just returned from a volleyball tournament and still had her spandex shorts on.
Note: Both sweaters are size 38 with 2 inches of positive ease.


The Strokkur sweater was knitted without modifications, but the Perry Street was not.
The body of Perry Street was in garter stitch and worked flat in pieces. I knit both the front and the back according to the pattern, but I was concerned about seaming flat-knitted sleeves onto the garter stitch body.
Instead, I looked at the pattern, which was knit from the cuff up, and figured out that it called for 69 stitches at the widest part of the sleeve, just before the sleep cap shaping began. I took that number and picked up 68 stitches around the open arm hole, beginning at the bottom and making sure that I picked up 34 from the front and 34 from the back. Then I divided 38 by 3 to obtain the number 22. With stitch makers I isolated 11 stitches on either side of the top shoulder seam.
From the bottom of the arm hole, I knitted in ribbing, as called for in the pattern, past the first stitch marker and until I hit the second stitch marker. I slipped the second marker, then wrapped and turned the next stitch. In pattern, I knit back to the first stitch marker, slipped that marker, then wrapped and turned the next stitch.
With right side facing, I knit in pattern to the first stitch wrapped, picked up the wrapped stitch, then wrapped and turned the next stitch.
With wrong side facing, I knit in pattern to the second stitch wrapped, picked up the wrapped stitch, then wrapped and turned the next stitch.
This sequence set up the sleeve to be knit top down with the short rows creating my sleeve cap.
I continued wrapping and turning until there were six unwrapped stitches remaining at the bottom of the arm hole, three from the front and three from the back. At this point, I just knit in pattern across those six stitches, picked up the last unwrapped stitch and began knitting-in-the-round.
With respect to the decreases in the sleeve, I reversed the sleeve shaping from the instructions given, subtracting one, as I began with 68 stitches, instead of the 69 called for in the pattern. I reasoned that this number worked best for the ribbing pattern and at least one stitch (usually two) are lost when a flat knitted sleeve is seamed.
Knitting sleeves top-down is my preferred method because I can make the sleeves as long or as short as I like AND, easing in the seams for sleeves is much more difficult.
In this case, I was dreaded trying to seam ribbed sleeves into a garter-stitched arm hole.
I hope this helps!
So, I actually had them both at my disposal yesterday afternoon.
Please note, it was really hot and humid down here in South Texas yesterday. Shorts were necessary. The younger daughter in the Perry Street had actually just returned from a volleyball tournament and still had her spandex shorts on.
Note: Both sweaters are size 38 with 2 inches of positive ease.

The Perry Street sweater was designed to be boxy with a slightly over-sized fit. I think it looks really cute on my not-so Wee One. The yarn was MadelineTosh Chunky in Composition Book Grey and Briar. What was so surprising about this pullover was the weight of the sweater. It is very heavy. I fear it will not get much use, as it is definitely warm. Despite all that, I think I might like one for me, without the chunky cables. It might be nice to have a chunky sweater for those one or two cold and rainy Sundays we might actually have around here! Ha!


The Strokkur sweater was knitted without modifications, but the Perry Street was not.
The body of Perry Street was in garter stitch and worked flat in pieces. I knit both the front and the back according to the pattern, but I was concerned about seaming flat-knitted sleeves onto the garter stitch body.
Instead, I looked at the pattern, which was knit from the cuff up, and figured out that it called for 69 stitches at the widest part of the sleeve, just before the sleep cap shaping began. I took that number and picked up 68 stitches around the open arm hole, beginning at the bottom and making sure that I picked up 34 from the front and 34 from the back. Then I divided 38 by 3 to obtain the number 22. With stitch makers I isolated 11 stitches on either side of the top shoulder seam.
From the bottom of the arm hole, I knitted in ribbing, as called for in the pattern, past the first stitch marker and until I hit the second stitch marker. I slipped the second marker, then wrapped and turned the next stitch. In pattern, I knit back to the first stitch marker, slipped that marker, then wrapped and turned the next stitch.
With right side facing, I knit in pattern to the first stitch wrapped, picked up the wrapped stitch, then wrapped and turned the next stitch.
With wrong side facing, I knit in pattern to the second stitch wrapped, picked up the wrapped stitch, then wrapped and turned the next stitch.
This sequence set up the sleeve to be knit top down with the short rows creating my sleeve cap.
I continued wrapping and turning until there were six unwrapped stitches remaining at the bottom of the arm hole, three from the front and three from the back. At this point, I just knit in pattern across those six stitches, picked up the last unwrapped stitch and began knitting-in-the-round.
With respect to the decreases in the sleeve, I reversed the sleeve shaping from the instructions given, subtracting one, as I began with 68 stitches, instead of the 69 called for in the pattern. I reasoned that this number worked best for the ribbing pattern and at least one stitch (usually two) are lost when a flat knitted sleeve is seamed.
Knitting sleeves top-down is my preferred method because I can make the sleeves as long or as short as I like AND, easing in the seams for sleeves is much more difficult.
In this case, I was dreaded trying to seam ribbed sleeves into a garter-stitched arm hole.
I hope this helps!


Comments